What if you didn’t need to read another guide about optimizing your on-page SEO and could start immediately implementing on-page SEO techniques that work in 2020.
The best part is that you can start right now with implementing them, and within a few hours, your site will be better optimized and you’ll be on your way to attracting the right type of traffic.
If you’re wondering what we’ll be covering, here’s a preview:
Title Tags
Meta Descriptions
Header (H) Tags
Image Optimizations
Schema Markup
Meta Keywords
Noindex Tag
Canonical Tag
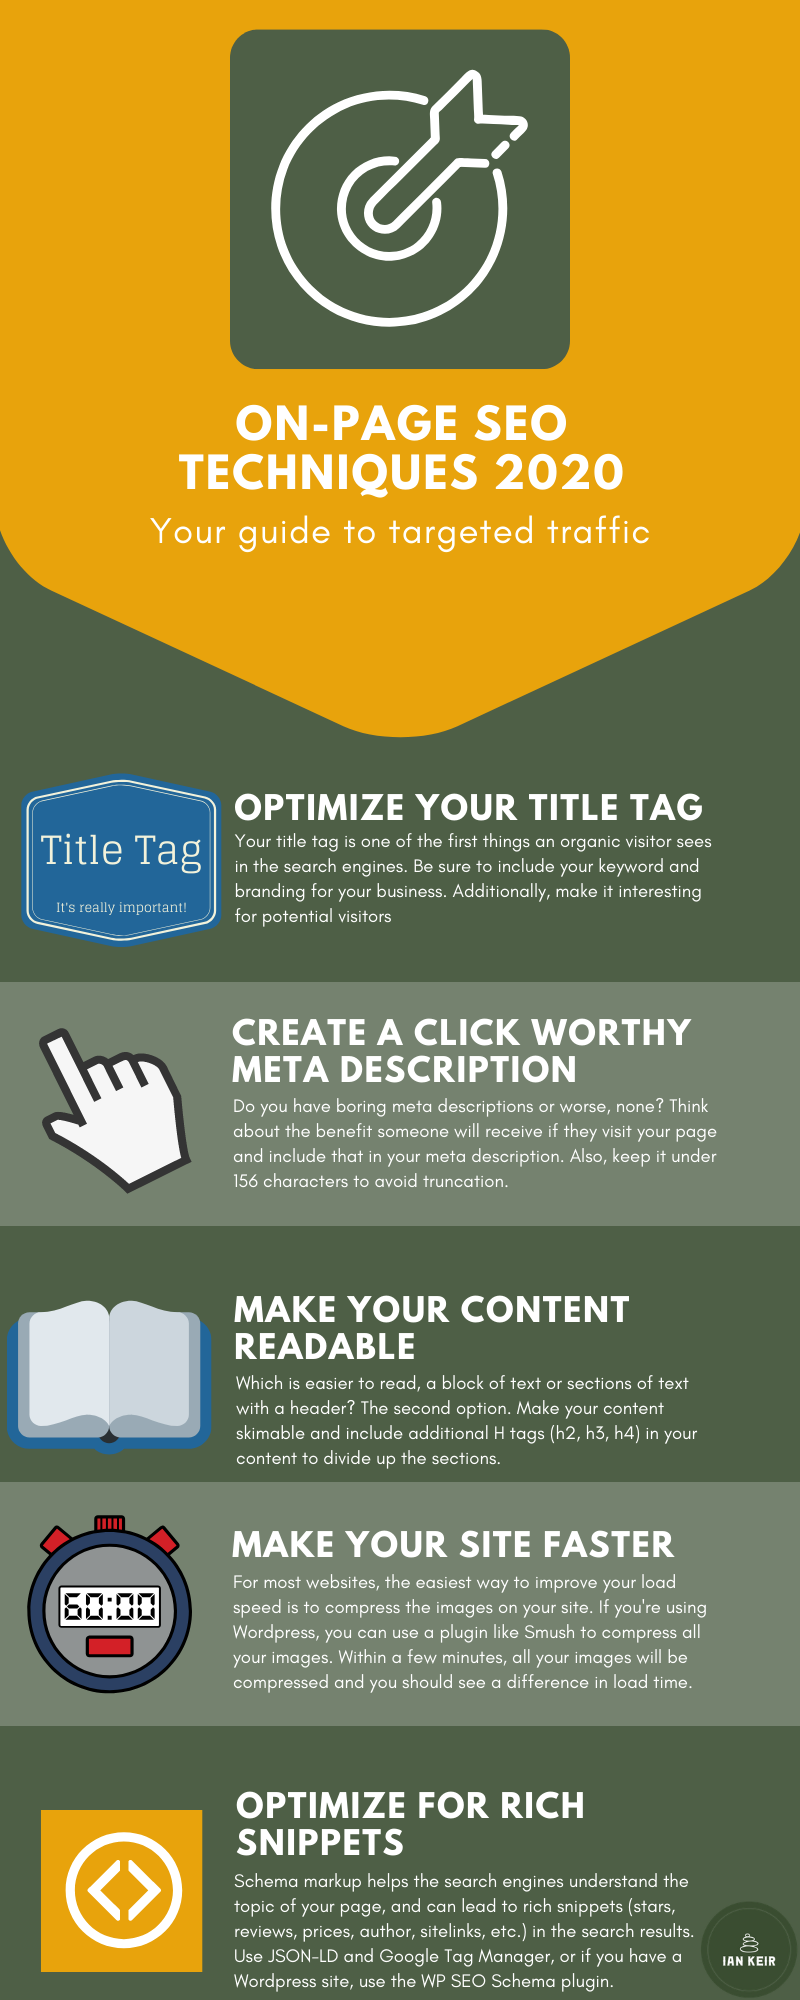
If you don’t have time to read the post, here’s a quick infographic that contains an overview of what you need to do. You can print it out, tape it by your desk, and reference it as you’re creating new pages or optimizing current pages.
There are two primary types of SEO: off-page SEO and on-page SEO. Off-page SEO looks at any of the activities and optimizations that take place NOT on your website. Off-page SEO is also more difficult because you don’t have direct control over it. On-page SEO techniques are any activities or optimizations that you have direct control over ON your website. We’ll be focusing today on on-page SEO techniques.

Introduction
On-page SEO techniques comprises several elements including title tags, meta descriptions, meta keywords, schema, header tags, and image optimizations. On-page elements can all be changed and adjusted either through the backend CMS and/or through a tag manager. Let’s start with looking at the title tag.
On-Page SEO Techniques 2020 Elements
Title Tag
[click_to_tweet tweet=”The title tag is one of the first things that a visitor will see. The title tag is one of the primary drivers of increasing click-through rate. @iankeir1 #seo #onpageseo” quote=”The title tag is one of the first things that a visitor will see. The title tag is one of the primary drivers of increasing click-through rate. @iankeir1 #seo #onpageseo”]
The title tag is one of the first things that a visitor will see. The title tag (while not visible to the viewer on the page, unless they are looking at the code) is what populates the SERPs and is one of the primary drivers of increasing click-through rate. The title tag should be between 35-70 characters and should include both the branding for your site as well as your target keyword. The title tag should be written in a way that encourages visitors to click-through and explain what they will find on the next page. Here is an example of how a title tag looks in the SERPs:
And here’s how it looks in the code on the page:
![]()
The title of the page may also be the title tag but you should always double check and not assume. If you’re using WordPress, Wix, Squarespace, or Bookmark, you will have the option to change the title of the page from the same WYSIWYG (What You See Is What You Get) editor where you change the content on the page.
Meta Description:
[click_to_tweet tweet=”The meta description should also contain a call to action of what you want the potential visitor to do. By including this in the description, it can make it more enticing and more likely to be clicked. @iankeir1 #seo #onpageseo” quote=”The meta description should also contain a call to action of what you want the potential visitor to do. By including this in the description, it can make it more enticing and more likely to be clicked. @iankeir1 #seo #onpageseo”]
The next on-page SEO technique is the meta description. The meta description isn’t seen by users except in the SERPs. The meta description is a brief synopsis of the page that tells potential visitors what the page is about and encourages them to click through and visit your site. The meta description should be between 120-156 characters in length. The meta description should include the keyword/s that the page is about and be used naturally within the description. The description should also contain a call to action of what you want the potential visitor to do (is it visit the page, buy, learn more, etc.). By including this in the description, it can make it more enticing and more likely to be clicked.
Here’s how a meta description is displayed in the SERPs:

When there isn’t a meta description present on a page, Google will pull text from the page and generate a dynamic meta description. Google will also do this when they try to match the intent of a search with text that it scrapes from the page. Here is an example of one of these dynamically generated descriptions:

It’s always a best practice to add a meta description to a page so that it minimizes the likelihood of Google generating dynamic text. If you’re using Squarespace, Wix, or Bookmark, each of these platforms will have a section to add a meta description for a page in the same place where you add the content. If you’re using WordPress, you’ll need to add an SEO plugin to add a meta description. My favorite WordPress plugin for SEO is All-in-One SEO. If you’re using this plugin or Yoast, you’ll have the option to change the meta description at the bottom of the page you are editing.
Header Tags:
[click_to_tweet tweet=”Header tags are used to show a visual outline of a page. They should be used to denote sections of a webpage and to give readers a visual pause in-between topics on a page. @iankeir1 #seo #onpageseo” quote=”Header tags are used to show a visual outline of a page. They should be used to denote sections of a webpage and to give readers a visual pause in-between topics on a page. @iankeir1 #seo #onpageseo”]
Header tags are one of the most important elements on a webpage because you use them to communicate site structure and contents to both the search engines and to users. Header tags are used to divide up a webpage into sections. They start with the H1 tag and you can go all the way down to H6 (but not recommended). The title of the page should be the only H1, and the rest of the site should be structured with other header tags.
Header tags are used to show a visual outline of a page. They should be used to denote sections of a webpage and to give readers a visual pause in-between topics on a page. Wikipedia is a great example of how a webpage can be structured with optimal header tags. Here is an image showing a Wikipedia page where header tags are used:
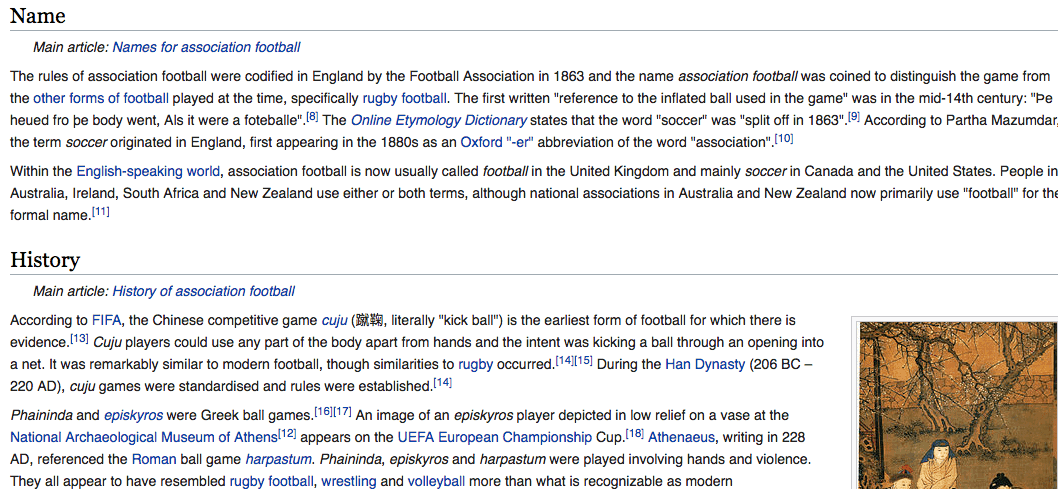
And here’s a page where header tags are not used:

Which page is easier to read?
Right, the one with the header tags. When you’re doing SEO, you need to remember that you want to be creating the best experience for the search engines, while remembering that ultimately, you want your real visitors to have the best experience, because it’s the human visitors who will become your customers. Not the search engines.
You can update your header tags in any website editor by selecting the text you want to change and selecting from the text drop down (in WordPress the default is “Paragraph”) and selecting the appropriate header tag.
Images Optimization
[click_to_tweet tweet=”The best answer to images that are too large is to use an image compression software that removes the extraneous information, but doesn’t change the quality of the image. @iankeir1 #seo #onpageseo” quote=”The best answer to images that are too large is to use an image compression software that removes the extraneous information, but doesn’t change the quality of the image. @iankeir1 #seo #onpageseo”]
There are three key image elements to optimize for your on-page SEO, these are the image file name, the alt text, and size of the image. Where possible, the image file name shouldn’t just be a random collection of letters and numbers, but should be driven by your keyword strategy and should accurately describe what the image is depicting. This is one of the many signals that you can send to the search engines to explain what your page is about. Don’t, and I repeat DON’T keyword stuff your image file names. That’s just pure spam and a great way to agitate both the search engines and your visitors.
The second element to optimize is your alt text. Alt text is the text for any image on a website that describes what the image is showing. Alt text is usually shown if the image doesn’t load, or if a visitor is using a screen reader to access your site. Again, don’t keyword stuff, just describe in a short sentence what the image is showing. This is extremely important to do if you service individuals who are visually impaired and is one of the many steps to be 508 compliant website (for more information about the steps and tests for becoming a compliant website, I would encourage you to visit the federal government’s 508 compliance site for more information and further resources).
The third element to make sure you have optimized is the file size of your images. With each image you add to your website, the load time increases. This is especially important if you are using images that are a larger dimension than the space you are filling. This extra picture information can dramatically slow down a website. The best answer to images that are too large is to use an image compression software that removes the extraneous information, but doesn’t change the quality of the image.
There are plenty of free WordPress plugins to optimize your images. I like using ShortPixel for image compression. There is also WP Smush and Ewww Image Optimizer. If you’re not using WordPress, you can compress the image before you upload it using either ShortPixel (which is not exclusively a WordPress plugin) or TinyPNG.
Schema
[click_to_tweet tweet=”While it isn’t a guarantee that the search engines will decide to use the schema on your page, it can increase the likelihood of showing up for keywords and can provide you with richer results like stars, ratings, and even images. @iankeir1 #seo #onpageseo” quote=”While it isn’t a guarantee that the search engines will decide to use the schema on your page, it can increase the likelihood of showing up for keywords and can provide you with richer results like stars, ratings, and even images. @iankeir1 #seo #onpageseo”]
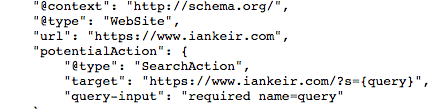
Schema markup is additional code on your website that explains to the search engines what a webpage is about and puts the text and images on a site into a language that the search engines can understand. Schema markup can either be hard-coded onto a page, or it can be fired through Google Tag Manager. There are several types of schema markup, but they all share the same structure. They define and declare a variable.
Here’s an example of JSON-LD (a programming language) showing a snippet of schema.
There are several types of schema that you can add to a website. Here are the most popular types:
- Article schema
- Blog schema
- Organization schema
- Website schema
- FAQ schema
- Breadcrumb schema
- Business schema
- Video schema
- Review schema
- Rating schema
- Aggregate review schema
- Local Business schema
- And the list goes on
For a full list of schema types you can visit http://schema.org.
While it isn’t a guarantee that the search engines will read and decide to use the schema on your page, it can increase the likelihood of showing up for keywords and can provide you with richer results like stars, ratings, and even images.
You can add schema markup to your website through one of several options. If your site is on WordPress, you can use a schema markup plugin (I use and prefer WP SEO Structured Data Schema plugin). This will allow you to fill in the necessary fields, and the plugin will generate the schema markup automatically.
If you are not using WordPress, or you have a large website, it can be challenging to manually add schema markup to each page (which is an option, but not recommended). You can deploy your schema markup by using Google Tag Manager (you would want to utilize the custom HTML tag). Then set your trigger to the page or pages you want it to fire on, and you’re all set.
To write the schema markup that you’ll deploy through Tag Manager, you can use one of two sources. The first is using tutorials from Google (like this one for article schema https://developers.google.com/search/docs/data-types/article). They have a complete list you can reference. You can find an example that is similar to your use case, open it in the Structured Data Testing Tool, and adjust it for your needs. Then, validate your work (making sure it’s free of errors), and add it to Google Tag Manager.
The other source you can use for writing schema markup is Steal Our JSONLD. They have dozens of examples that you can copy, go to Google Structured Data Testing Tool, adjust, validate, and implement.
Other On-Page SEO Techniques 2020
While there are several tags that should be optimized for your on-page SEO, there are several other tags that need to be handled carefully (if you’re still using them), used cautiously, or left empty. If implemented incorrectly, these tags will hurt your SEO at worst, or will be a waste of time, at best.
Meta Keywords
[click_to_tweet tweet=”Stop using the meta keywords tag. This is an old tag that was used to define what keywords you wanted a page to rank for in the SERPs. @iankeir1 #seo #onpageseo” quote=”Stop using the meta keywords tag. This is an old tag that was used to define what keywords you wanted a page to rank for in the SERPs. @iankeir1 #seo #onpageseo”]
First, stop using the meta keywords tag. This is an old tag that was used to define what keywords you wanted a page to rank for in the SERPs. This was from the days before the search engines could read the page and understand semantically what the page is about. Now, the search engines can read the page and generally grasp the content on a webpage. Anyone can go into the code on your webpage and see what keywords you’re trying to rank for in the search engines.
At best, by continuing to use it, you are wasting your time, at worst, you are giving away your entire keyword strategy to your competitors (additionally, Google has said that they ignore this tag so really, why bother!). If you’re using Bookmark, there is an area to add meta keywords. Just leave it blank, there is no harm in doing this.
Noindex (Follow or NoFollow) Tag
[click_to_tweet tweet=”If you use a noindex tag on a page, it’s not guaranteed that a page will remain out of the search engines index. @iankeir1 #seo #onpageseo” quote=”If you use a noindex tag on a page, it’s not guaranteed that a page will remain out of the search engines index. @iankeir1 #seo #onpageseo”]
The noindex tag can be a helpful tag to utilize on your website. However, it can also damage your SEO work as well when used carelessly. This meta tag instructs bots coming to the site to not index the page. The tag should be placed in the <head> portion of your website. Additionally, it should be noted that it’s not guaranteed that a page using a noindex tag will remain out of the search engines index. The noindex tag should be used on pages you don’t want indexed. These type of pages might include parametered searches (as sometimes a canonical tag doesn’t work), gated content, thank you pages, etc. The second element of this tag (follow or nofollow) tells search engines whether or not you want the search spiders to follow or ignore the links on the page.
If you do not want a page to be indexed in the search engines, it’s always better to require a username/password to view the content. By doing this, you can avoid having the page indexed accidentally.
Canonical Tag
[click_to_tweet tweet=”The canonical tag is one of the most important tags that you can include on your page. The canonical defines what version of a page is the original. @iankeir1 #seo #onpageseo” quote=”The canonical tag is one of the most important tags that you can include on your page. The canonical defines what version of a page is the original. @iankeir1 #seo #onpageseo”]
The canonical tag is one of the most important tags that you can include on your page. The canonical defines what version of a page is the original. Say for example you had one page /pageaboutsomething and another /pageaboutsomething?utm_source=newsletter&utm_medium=email&utm_campaign=example. You wouldn’t want the second page to be indexed because except for the URL, they are exactly the same. The canonical tag tells the search engines which version of a page is the original. This is particularly helpful when you have multiple versions of the same page with only slight differences (such as a product sort page) and by having each variation indexed, you dilute the authority and value of the page.
A canonical tag is also helpful as a small preventative measure against plagiarism. If someone visits your website and copies your code, they will also copy the canonical. When this stolen code is placed on their site, it will still point back to your site as the original version. If there is any equity that the page builds up, it will all be directed back to you.
I hope that these on-page SEO techniques will help you to better optimize your website and create a better user experience for bots and humans in 2020. Are there any you techniques you think I forgot? If so, let me know in the comments. If you enjoyed this post, subscribe to be notified when I post new content.


0 Comments